Whether you have a separate home theater room, or your system shares a space with your living room, these free tweaks can help you get the most out of your technology.
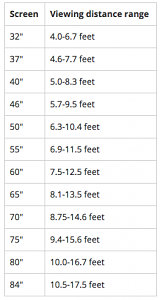
How far your seats should be from your TV or projector screen depends on the size of the screen. If you’re too close, you’ll have to actually turn your head to see the action (think about sitting in the front row of a movie theater.)
On the other hand, if you’re too far away, you’ll have difficulty seeing the action on the screen.
Here’s a handy chart from Crutchfield that shows the optimal viewing distance of different screen sizes.
For an even more detailed breakdown of optimum viewing angles and distances, check out this article from Acoustic Frontiers.
Sound can make or break a home theater experience. So, make sure you’re getting the most out of your speakers by tweaking their placement.
You should already know whether you have a 5.1, 7.1 or 9.1 setup and your speakers will likely be placed similarly to how Dolby recommends.
And while that’s a good start, here are some additional tips that can improve your sound output:
Note: We’re assuming you purchased good, quality speakers. No amount of optimization will get great sound out of poor speakers.
Once you’ve got your speakers placed well, it’s time to calibrate them with your receiver.
Basically, this step adjusts the output of each individual speaker to give you the best sound based on your room and setup. Most receivers have an auto-calibration mode.
Do this: Plug in the included microphone, run the calibration program and follow the on-screen prompts.
For more information, check out this video from Crutchfield on auto-calibrating your receiver.
Lifehacker calls calibrating your TV the “easiest upgrade you can make to your home theater”.
You’ll need a calibration disc. The most often used one by DIYers is AVS HD 709 Calibration Disc because it’s free (you download it and burn it to a DVD or Blu-ray disc.)
For the rest of the tutorial, check out this guide on Lifehacker.
BriteBox is a home theater installation and home automation company serving the entire metro Atlanta area. For more information, contact us online.
Get up-to-date current news, promotions, and industry tips.